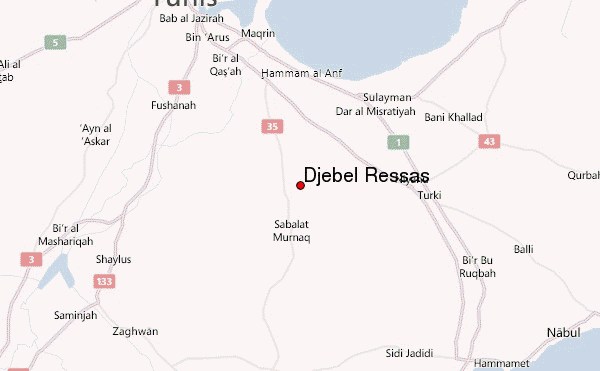
Djebel Ressas,
Tunisia
(36o36’25.41” N / 10 o 20’12.27” E)
Suggested Hikes, Climbs and Scrambles
Jim Ryan (2008)
Forward
If you know where to look, there are several intriguing natural areas to discover within striking distance from Tunis. On the other hand, if you’re new to the region or if you don’t speak French or Arabic, then finding and reaching such places can be tricky. This brief guide is intended as a tool for folks who live in the Tunis area and would like to explore Djebel Ressas, a prominent peak not far from town. Read on for an introduction to the mountain, as well as descriptions of day outings that range from the casual and relaxed to the physically challenging.
Background
In the months prior to moving with my family to teach in Tunisia I searched online for information about rock climbing here. I didn’t find much. And I learned little from the residents I spoke with after we’d arrived. No printed stuff either, at least not in English. Apparently, if there had been climbing going on around here, it was pretty low key.
After settling in for a couple of weeks we took a drive to Hammamet, passing Djebel Ressas along the way. The mountain’s profile impressed me and even from the highway I could see it would be a fun place to visit.
Soon afterward I was introduced to Christian Hettick, a kindred climbing enthusiast who had been living in Tunis for a year and had already surveyed a few outdoor recreation sites. Together, he and I began exploring Djebel Ressas and we put up a handful of modest first ascents. Our access was unlimited and, except for some curious goat herders, we had the mountain to ourselves. In the cliffs, we sometimes found old evidence of past climbing activity, but we never came across other climbers and very rarely saw other hikers. So what we learned about the place, we pretty much figured out on our own.
Over the next four years I logged much of my free time on the peak, sometimes with friends and family, sometimes with students, and often alone, hiking and bouldering on the limestone cliffs, always on the lookout for interesting viewpoints and new routes. The mountain became a special and increasingly familiar place for me.
After living in Tunisia for four years my family relocated to Asia. But before we left I wanted to make a record of what I’d learned about this one small corner of the country. If you’re looking for some scenic hikes, or if you’re curious about regional climbing, like I was when I first arrived, then I leave this short guide for you. I hope it gives you a head start to appreciating what Djebel Ressas can offer.
Geography & Geologic History
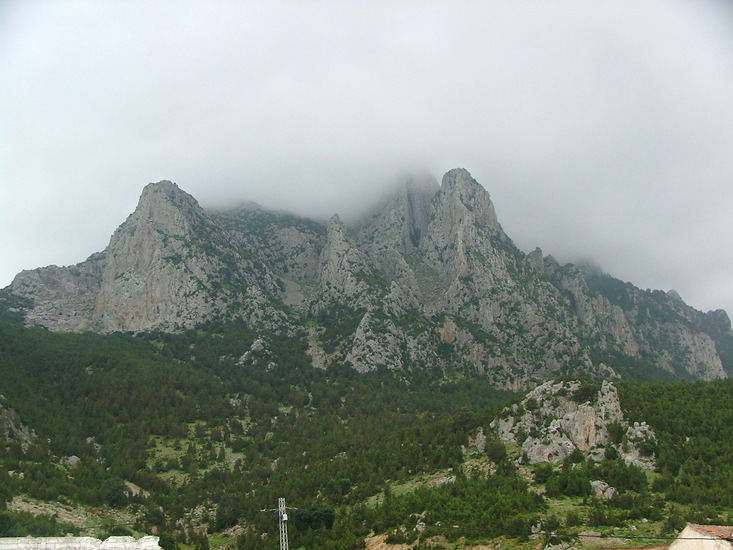
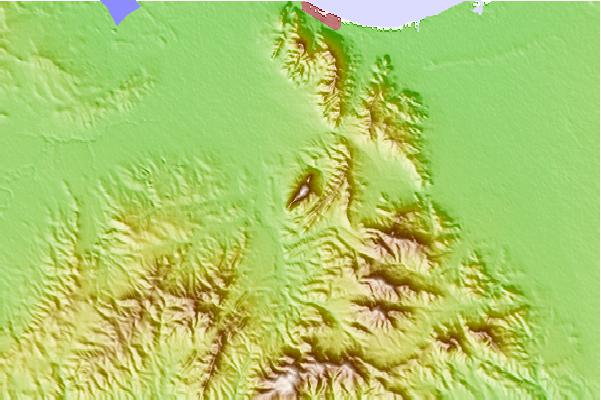
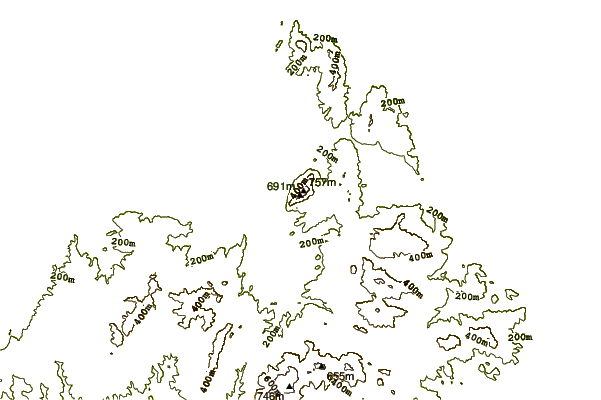
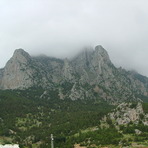
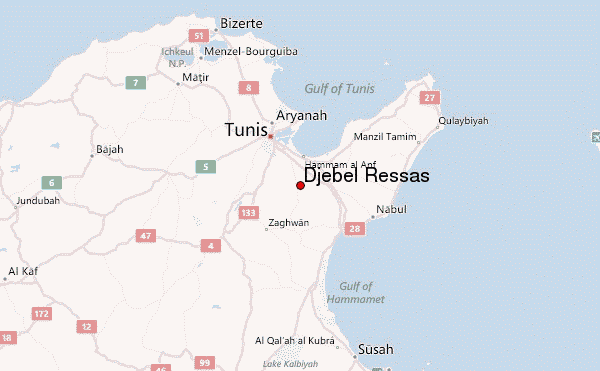
Djebel Ressas is a high and rugged outcropping of Jurassic limestone situated on the horizon southeast of Tunis. Competing in the foreground, the familiar profile of Djebel Boukournine may appear taller, but at 750 meters Ressas is the dominant peak. Along the highway between Tunis and Hammamet there are excellent views of the mountain as you look south from near the tollbooths, just past the exit to Mornag.
The geologic origins of Djebel Ressas and the neighboring peaks date to earlier than 100 million years ago. That’s around when the very largest of all carnivorous dinosaurs, Spinosaurus aegyptiacus (the massive menace in Jurassic Park III) was hunting in what is currently the Sahara desert in southern Tunisia.[1] At that time, this region was a vast and swampy tropical paradise abundant with life. [2]
Meanwhile, just to the north, the teensiest of prehistoric animals, known as radiolarians, dwelt in a primordial sea that was the grand dad of today’s Mediterranean. Covering much of what we now call the Maghreb of northern Africa, jillions of these ‘shelled’ microorganisms inhabited that exotic marine environment[3], depositing their crusty nano-carcasses on the bottom when they died. Countless layers of their organic remains got compacted and cemented into calcified rock on the base of the ancient seafloor, ultimately forming the limestone fabric for a future mountain range..
Over eons, tectonic forces laterally compressed southern regions of this sedimentary basement, thrusting buttes and peaks upward along contorted faults and nudging the sea north to its present shoreline. Voila! The Atlas Mountains wrinkled across the upper, leading edge of Africa, with Ressas at the northeastern terminus of the range.
Today, astute hikers can discover very cool marine fossils and hefty, angular calcite crystals in the high crags; ornaments to remind us of the mountain’s organic genesis back in a distant era.
Human History
Earliest references in literature indicate the countryside adjacent to Djebel Ressas was possibly the location of a famous military engagement, fought and won decisively by the empire of Carthage against rebel mercenaries and other local enemies, late in the second century B.C. Known as the “Battle of The Saw”, the event is historically significant for the 40,000 lives it claimed. [4]
During the Second World War, the mountain was effectively defended by an isolated German artillery unit until the very end of that conflict in north Africa in May of 1943. [5]
Contrasting with earlier hostilities on the slopes, agriculture is what’s happening there now. Today most of the mountain is a quiet host to olive orchards and small herds of domestic livestock. The nearby town of Mornag has become the capitol of a flourishing wine producing region.
In Arabic, the name Djebel Ressas literally means ‘mountain of lead’, a reference to the ore that was mined there, perhaps from Roman times until the late 19th or early 20th century. The southeastern slopes of the djebel still support an active rock and gravel quarry. Materials from this site are used to produce cement and stone matter for meeting the demands of Tunisia’s rapidly expanding road systems and building infrastructure.[6]
General Orientation
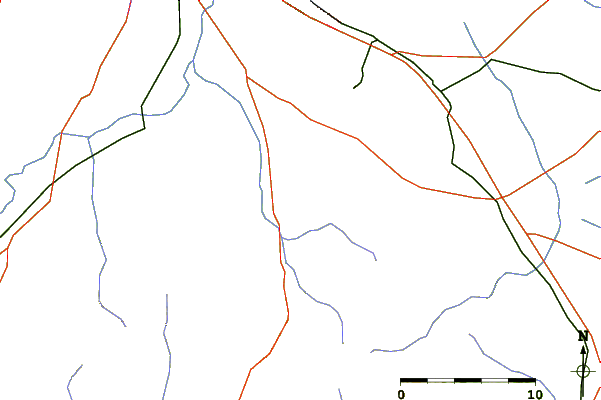
Most of Djebel Ressas is now an excellent setting for a day of rewarding outdoor activity. But the site hasn’t been developed, in any formal sense, as a recreational objective. Perhaps that’s partly due to its official status as a “nature preserve”. Just as likely, though, it’s because there isn’t yet much of a demand for that kind of development in Tunisia. Ressas is a bit off the beaten path, and most folks prefer to spend their leisure time nearer to the beaches or in other venues. So at this writing there are no maintained hiking trails, trail markers, or service facilities at the mountain, and an internet search will reveal scant information about the modern topography of the area. However, images viewed on Google Earth™ give a good idea of the access roads and the general landscape.
A handful of neglected utility trails exist on the slopes that once served the abandoned mines. Nevertheless, most of the hiking on and around the mountain involves the use of rough paths etched by herds of sheep and goats moving between foraging sites. Naturally, these tracks are scrappy and ambiguous, and they tend to chaotically intersect one another like irregular runnels in a dry riverbed. Adequate route-finding skills and a good sense of direction (or a compass or GPS) might be needed to initially find your way around with confidence. Even still, this brief guide alone should be enough to at least get you started.
The hikes described here lead to some stunning viewpoints and worthwhile climbing sites. Along with taking in the interesting geography, you can spot small reptiles, graceful birds of prey, clusters of guinea fowl and maybe, with caution, you’ll encounter a group of burly, wild boar digging for roots and rodents. After one or two trips you’ll likely gain enough familiarity with the region to explore uncharted areas on your own.
Bringing your own food, water and basic first aide supplies is a good idea. The village of Fonderie is less than three kilometers from the trailheads, and it might be possible to buy bread, water and even sandwiches there. However, the nearest town, Mornag, with gas and other supplies is about ten kilometers away.
Driving Directions (45-50 minutes; good roads.)
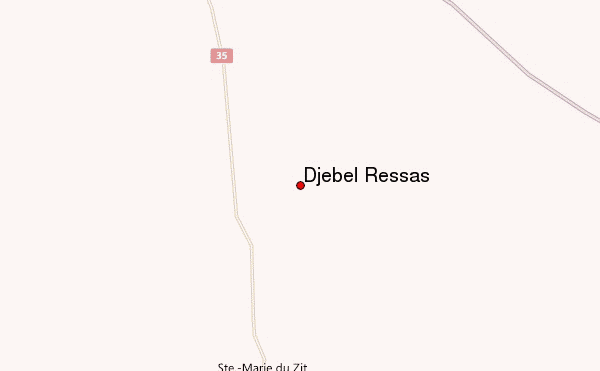
Djebel Ressas is about a 30 km drive from Tunis in the direction of Mornag. To get there…
a) Travel southeast on A1 for about 15 km, following signs to Hammamet and Sousse.
b) Take the “Mornag” exit, just before the tollbooths. Turn right at the top of the exit ramp, then down and left at the first stop sign you’ll see.
c) Keep to the road for 0.5 km and take the first right you come to, now following signs to Mornag.
d) Drive about 2 km straight into Mornag proper, crossing the first intersection you reach and making a left turn at the second intersection. (A right turn at this intersection would put you immediately at the last gas station en route.)
e) Now you’re in the middle of town and traveling southeast on C35 (although the road is unmarked) toward Djebel Ressas. On most days you’ll probably notice a bustling open market along the right side of the road.
f) Stay on the road for about 7 km, following signs for Bouficha until you see a signpost on the left with markings for Fonderie and Jebel Ressas.
g) Turn left at the signpost and follow the rural road for nearly 2 km, past orchards and farmhouses, until you see a small, unsigned lane branching off to the left. Follow this winding lane for 1.5 km to its end.
h) You’ll know you’re there when you’ve reached an empty lot adjacent to a sleepy farming settlement and framed by Djebel Ressas in the background.
The locals here are friendly and hard working, but most adults speak no French and certainly no English. Occasionally, small children will approach you with playful curiosity. The area is usually quiet and, if your car is locked and your valuables are inconspicuous, you can expect things to remain undisturbed while you’re gone. It’s smart to park near the edge of the lot, as sometimes the local kids use it for a soccer pitch, and if your vehicle is at midfield they’ll just play right over it.
Local Red Tape
[Keep in mind that I originally prepared this article prior to the 2011 revolution & Arab spring. Since then, some of the following information may not be accurate.]
Until January of 2007 hikers at Djebel Ressas could come and go as they pleased. That winter, however, stricter regulations were established following a brief police action against fundamental Islamic insurgents hiding in the surrounding region. As of now, permission must be granted in order to explore the mountain legally. This can be arranged by checking in at a national guard station in the nearby village of Mornag and receiving a permit. Later, you’ll present the permit to a uniformed officer waiting at the base of the mountain. This officer is usually the same, older gentleman, who speaks Arabic and just a smattering of French. He’s friendly but firm, and he won’t let you proceed without that permit.
If you don’t mind flying under the radar, an unofficial approach would be to head up early enough in the morning (say before 8:00 am) so that you’d arrive at the trailhead before the officer, thereby avoiding the annoying detail of acquiring and presenting a permit. Know, however, that later, when you return to your car, he’ll probably be waiting there to give you a scolding.
It may be possible to arrange for permission in advance by contacting the regional security officer at your country’s embassy in Tunis. I do this when I’m scheduling a group excursion to the mountain, just to avoid any hassles. You’ll be asked to provide basic information about your trip such as the date, number of your party, names of participants, and a brief itinerary outlining your plans. Working with the U.S. embassy, it usually takes me from one to two weeks to secure a permit in this way.
Hiking Directions
All the paths described here begin a short distance from the car park area. Orient yourself by facing the mountain’s highest visible peak (The Terminator Buttress), which is due south of your car. Walk southwest on a little dirt lane that leads to the right corner of the settlement, and then behind a group of sheds. Try to ignore the grumpy, barking dogs that will likely approach and threaten as you go by. Once you’ve passed the buildings, you’ll notice to your left and higher up, a blocky, white-washed cement structure (with a distinctive blue door) that houses a cistern. From this point you can choose to follow one of the routes described below, or make a path of your own.
1. The Summit Trail
(Challenging, 2 hours from the car.)
There are many ways to the top, and none are easy. The route described here is, in my opinion, the fastest and least demanding. An adult who is in good shape and walking at a steady pace should be able to reach the summit in less than two hours. Active children with exceptional stamina can also manage the trek. One way, from the car to the top, is about two kilometers and very steep.
Directions:
Follow the primitive lane from the car park to the back of the farming settlement and below the white cistern. Instead of continuing on the farm lane (which proceeds straight & level, and then bends right), follow an inconspicuous footpath that diverges to the left and upward, toward the mountain. This path climbs above the lane (which you’ll see below and on your right), taking you through scattered trees and eventually above and parallel to the east bank of a dry creek bed.
After hiking about 200 meters, the path will cross the dry bed. At the crossing point, leave the trail and hike several paces up a rocky ravine to an especially gnarly (and partially burned) old tree in the center of the drainage. Continue beyond the tree for another 30m, then exit the ravine to the right and head 100m west toward a large clearing. When you enter the clearing, turn south (left) to again face the highest visible peak. Then walk 50m in that direction, toward a lone boulder that’s roughly two meters in diameter. Find an indistinct goat track passing just a few meters beyond the boulder and follow it 100 m southwest (right) until it enters trees and develops into a clearly defined path.
Hike south on this trail (with the mountain to your left) for about 150 more meters, passing boulders and trees, until you notice a grassy slope immediately to your left. A stone cairn, has been placed near the trail to mark this spot. Hopefully it will still exist when you arrive!
From the cairn, leave the trail and travel southeast, scrambling up and left onto the slope. After 50 meters you’ll pass through the last of the trees and onto a wide ramp of scree and talus extending down from the heights. Now, the ascent route becomes more obvious as the surrounding cliffs seem to naturally corral you onward, upward and left to higher regions.
If you have an interest in technical rock climbing, the cliffs along this passage offer solid top roping and trad routes. It’s where I usually go with my friends, anyway. The climbing surfaces are described later, in the School of Rock section of this guide.
As you push on, gullies and small canyons occasionally reveal themselves to the right or left. These can be fun to explore, but the most efficient way up is to avoid them in favor of the vast, leftward ascending slope of grass and boulders. Nearing the skyline, you might notice a couple of old mining excavations along the way before you reach the summit ridge.
Winning the ridge is fun, but it doesn’t mean you’re done; you still have another 20-30 minutes of hiking before you’ll top out on the true summit. Continue south and mostly upward along foliated, uneven terrain, with the summit peak now clearly in your sights. You’ll need to make a short descent onto a saddle at the base of the final summit approach. From there, it’s just one last upward scramble (maybe 60 meters?) that’ll bring you to the very top: a rocky field, blemished with an old stone fire pit, but commanding excellent panoramic views. You’ll see the distant, urban sprawl of Rades and Tunis to the northwest; the Mediterranean and Djebel Boukournine to the north; and Djebel Zaghouan (elev. 890 m) to the south.
It’s lonely at the top! In spite of its worthiness, the summit isn’t a hugely popular destination. In fact, you’re more likely to share it with free ranging donkeys, goats, or even cattle than with other hikers.
While it’s possible to return to the car via other tempting paths, the quickest and most reliable way down is to reverse and retrace the now-familiar ascent route. Keep sharp, though, because you wouldn’t be the first to get disoriented and temporarily lost on the descent.
Remember that ramp of loose scree and talus you followed for part of the way up? You just might cut 10 minutes from your descent time if you’re comfortable performing a scree-glissade down its belly. However, if now you’re wondering ‘what’s a scree glissade?’ then forget I mentioned it and just tread carefully down the west edge of that long loose section. Safety first!
2. The Picnic Boulders
(Easy; 15 minutes from the car.)
If you’re in the mood for a mellow and scenic stroll, or if you’re looking for a site that young kids will dig, the Picnic Boulders make a fine destination. Like the name implies, you’d be advised to bring a well-packed lunch. When you arrive, you’ll want to sit for a while and munch on something as you appreciate the scenery and watch your kids scramble around. It’s a short walk from the car (about ½ a kilometer), but you should allow plenty of time for additional exploring.
Directions:
From the car park, follow the primitive lane to the back of the farming settlement and below the white cistern. Then, hike east, up and behind the cistern, and continue east on a tractor road. As you walk, the mountain should be on your right with the farming settlement on your left. After about 150 meters you may cross some wet drainage lines fed by an obvious fresh-water spring just off the right side of the road (Watch for acrobatic frogs!). Keep hiking another 100 meters or so until the road widens a bit and seems to terminate in a small lot.
Instead of continuing across this lot to the opposite end, examine the right side and find an opening between the trees where a footpath leads up toward the mountain. Follow this path a few paces and immediately you should recognize a massive, house-sized boulder in front of you. Make your way around this huge obstacle and enter an extensive boulder field littered with a zillion stones of all sizes and shapes. You’re there!
As you unpack the snacks, take a moment to consider your surroundings. Large and small, all of the lithic monuments in view must have been dislodged from the vertical cliffs high above. Fallen victims of tenacious erosive forces, each rock has tumbled here and contributed to this unique setting. In fact, looking at the cliffs, you can just make out fresh scars that remain following some of the more recent displacements. It’s an ongoing process spanning tens of millions of years.
These days the stony field makes an outstanding natural playground for fledgling climbers. Two immense rocks, ‘The Picnic Boulders’, stand out conspicuously, higher up on the slope. Originally, these must have been portions of a lone monolith that split and fragmented sometime after its cataclysmic deposition. Luckily, they now provide terrific surfaces for casual climbing. On their north side, the lesser of the two giant stones offers a handful of short top-roping routes that are both easy and fun. Plus, more than a few tricky bouldering puzzles can be imagined here.
If you’d like to explore beyond the boulder field, try scrambling up to the top of the scree ramp above the Picnic Boulders, and have a look around. From there you could choose to investigate a wide open pit leading down to an abandoned mine. Or, you might wander east to check out a tall, slender tower of limestone standing apart from the main cliffs. Near the base of this narrow pinnacle you’ll find more mine shafts and caves, as well as trails that continue on around the rest of the djebel.
Poking around further up from the Picnic Boulders you can find more crags, which can be protected with slings for top-roped climbing. Plus, there’s a huge crater (maybe 40 meters wide and 15-20 meters deep?) that’s worth checking out as well.
3. The Circuit
(Moderate-Difficult; 3-3½ hours, round trip.)
A trek around the entire mountain is possible, but unrefined. Part of this eleven kilometer hike will require patience and nominal route finding. Nevertheless, if the weather is fair and you’re on a soft schedule, it can be a very pleasant way to sample a slice of placid Tunisian countryside. A mountain bike can also be a fun and challenging way to navigate this course.
Begin as if you are hiking to the Picnic Boulders. When you reach the lot at the end of the tractor road, walk straight across to the opposite end and find the beginning of a path that continues northeast. Keeping to this track, you’ll end up hiking east and then south around the northern slopes of Djebel Ressas.
After about 1.5 km of rocky hiking, you’ll pass two shallow pits dug just to the right of the trail. These are backed by a short wall of exposed boulders, maybe one meter in height. If you’re sharp-eyed (like a young Ben Daley c. spring 2006), you’ll spot an impressive fist-sized ammonite mold, fossilized within the stonewall and situated between the two dug-out pits. About 150 meters after this fossil site, you’ll enter a scenic meadow with pastoral views.
Another kilometer of hiking (keeping to your left when the trail seems to fork) takes you past a couple of clearings and an isolated, remote farm. From here the trail gives out and you’re on your own in terms of route finding. This isn’t much of a problem since the mountain is always visible on your right as a reliable point of reference.
Leaving the farm, you’ll notice a heavily eroded dirt and gravel road to your left, which you’ll intercept sooner or later as you continue your circuit of the mountain. The road gradually improves and, after about 2 km, leads to a working rock quarry, active with busy dump trucks and huge front-loading excavators. Be careful out there! Those drivers are all business and they probably won’t be expecting to meet day trippers like yourself.
The simplest way forward is to continue ambling past the dusty mining operation and onto the paved road that takes you around the southern base of the djebel, all the way to another road leading to Fonderie. From then on it’s just a matter of tracing the piste through the village and back to your car.
It’s possible, but not easy, to ascend the slopes above the quarry in order to cross over the summit ridge. Finding a suitable way up might require some hit-and-miss route finding through scrappy, foliated terrain. Once on top, however, you could descend into the Old Mining Complex and, from there, hike on a better trail back to the car park area.
4. The North Step
(Easy-Moderate; 45 minutes from the car.)
This hike is an excellent compromise for those who’d like to enjoy spectacular views without committing to the more demanding trail to the summit.
Begin by following the directions for the Summit Trail. When you reach the spot where the trail crosses a dry creek bed (after about 200 meters) leave the trail and follow the rocky ravine upward. Continue upward and a bit left, through scrubby trees, until you’re on the wide saddle connecting the higher mountain on your right with the flat, lower mountain on your left. From the saddle, hike north (left) up onto the surface of the vast lower step. You’ll find terrific views from all points along the perimeter of this escarpment.
5. The Old Mining Complex
(Moderate-Difficult; 1 hour from the car.)
Begin by following directions to the summit trail. When you reach the stone cairn (from where you’d turn left in an ascent to the School of Rock or the Summit), continue hiking south on the trail for roughly half a kilometer through the forest, keeping the mountain on your left. The trail will become obscure at times, but with perseverance you’ll gradually escape the trees and enter remnants of an extensive, abandoned mining operation.
I don’t know the history of the site, but clues indicate it was last active during the early to middle twentieth century. Evidence of past excavations include massive, layered terraces, blasted and carved from the mountain side, as well as dozens of narrow shafts mined directly into its bulk. These latter sometimes penetrate completely through the formation to its east-facing slopes on the opposite side. Many (but not all) of these old tunnels are in rotten shape, and even a casual assessment will rightly convince most folks to stay clear.
Proceed with a combination of careful hiking and high angle scrambling to explore this neglected industrial site. Use exceptional caution, as you’ll probably encounter obscure pits, caves and structural ruins, which for decades have degraded into various stages of collapse and instability. Remember, you’re a long way from any professional help if things go bad and an emergency pops up.
On your return, rather than heading back the way you came, if you have the time and you’re still feeling adventurous, you might opt to complete an abbreviated loop of the mountain. This can be done by climbing up to the summit ridge and crossing over to the east side, then descending and continuing counter clockwise (north, west, then south) along the base of the mountain, via livestock trails and dirt paths, until you return to the car park area. The entire trek would cover about 6-7 kilometers and conservatively require about three hours.
6. The School of Rock
(Challenging; 30 minutes from the car.)
Solid rock surfaces on interesting cliffs and buttresses; this is where we often go for technical climbing. As a bonus, it’s also scenic, shaded, and a relatively short hike from the car. The area gets its name from the fact that I’ve often brought students and other new climbers here for an introduction to the sport.
Directions:
Begin by tracing the Summit Trail: Follow the primitive lane from the car park to the back of the farming settlement and below the white cistern. Instead of continuing on the farm lane (which proceeds straight & level, and then bends right), follow an inconspicuous footpath that diverges to the left and upward, toward the mountain. This path climbs above the lane (which you’ll see below and on your right), taking you through scattered trees and eventually above and parallel to the east bank of a dry creek bed.
After hiking for about 200 meters, the path will cross the dry bed. At the crossing point, leave the trail and hike several paces up a rocky ravine to somewhat burned and especially gnarly old tree in the center of the drainage. Continue beyond the tree for another 30m, then exit the ravine to the right and head 100m west toward a large clearing. When you enter the clearing, turn south (left) to again face the highest visible peak. Then walk 50m in that direction, toward a lone boulder that’s roughly 2 meters in diameter. Find an indistinct goat track passing just a few meters beyond the boulder and follow it 100 m southwest (right) until it enters trees and develops into a clearly defined path.
Hike south on this trail (with the mountain to your left) for about 150 more meters, passing boulders and trees, until you notice a grassy slope immediately to your left. A stone cairn, has been placed near the trail to mark this spot. Hopefully it will still exist when you arrive!
Turn left and scramble for 50 meters, up the steep slope, through the last of the trees and onto loose scree and talus. Move onward and upward for another 50m along the western (right) edge of the scree. After you pass a scraggly tree that’s right in the main current of the scree, keep ascending on loose rock until you’re forced to choose between continuing up onto a dirty outcropping or crossing the scree flow to your left. Choose the left option and carefully traverse for 15 m over the scree, to another scraggly tree on the opposite side of the flow. Just a few more steep paces will place you beneath the first of two large buttresses, which are divided by the upper terminus of the scree slope. This is the courtyard of the School of Rock.
Instead of continuing on the summit trail, which bypasses the buttresses and takes you to the right, find a place to park your gear and then check out the climbing possibilities.
General Climbing:
A nice feature of the School of Rock is that many of the routes remain shaded throughout the day. So, it can be a comfortable place to climb even during a scorcher.
If you already have some experience, the climbing here is easy to moderate, but also adventurous, so be prepared for loose rock and some dodgy pro. Much of the limestone is consolidated and strong, but some of it can be chossy, like a moldy stack of crackers.
The routes in this region are single pitched and typically rigged for top roping. These are protected with the help of natural anchor points found on top of the buttresses and the surrounding crags. Many can be secured with a couple of long (3 meter) slings looped over massive knobs, ‘chicken heads’ and boulders.
On trad’ routes, you’ll need to choose your gear placements carefully to avoid having them plucked during a zipper. For all the routes described, a relatively light rack will suffice, including a good range of stoppers, a handful of spring loaded camming devices, and maybe a few hexes and tri-cams.
A helmet for your belayer is strongly recommended! Loose stones abound and the route we call ‘Death Star’ was named for a chunk of falling rock that Christian Hettick was able to dodge as he faithfully belayed his partner. Please, advise your belayer to strap on a lid and avoid getting blanked by his own death star faster than anyone can whisper, ‘Look at the size of that thing!’
The YDS ratings indicated for any of the climbs are tentative and have only been backed up by a very small handful of experienced climbers. Besides, the folks I partner with aren’t much concerned about that side of the business, anyway. As long as you’re climbing with pals, and the rock is fun and safe, it’s all good.
The projects described here are just a fraction of what could be done, and there’s plenty of potential for new developments. Undoubtedly, stronger climbers will put up higher caliber routes in the future.
Star Wars Buttress (School of Rock)
[Jim Ryan & Christian Hettick, Summer ’05]
This narrow fin of rock is the lowest of the buttresses and the first one you’ll encounter when entering the School of Rock. It’s situated near the eastern boundary of the scree & talus flow. The upper ridge of the buttress can easily be rigged with anchors for a few solid top-roping routes.
To access the upper ridge, hike about 30 meters on ball-bearing scree, up along the western base of the buttress, until you come to a thread-like path that switches back toward the top. A short bit of 4th class climbing will put you there. Sturdy, natural cairns of angular boulders can be used as anchoring points, but make sure the stones are well situated; it doesn’t take much effort to tip some of these bad boys off into the abyss.
The following three routes can all be anchored from a single point.
A. Death Star (5.8+)
Begin in the exit of a ravine on the lower east side of the Star Wars Buttress. On solid holds, make your way to the base of a cracked boulder stacked about 11 meters above the belay stance. After a few thoughtful hand placements in those boulder cracks, traverse left and way over to an inset foot ledge, scratched along the base of a convex face beneath the anchors. From there, reach out with your feelings to seek jams and small holds hidden along a guiding, vertical seam just above you. Before long, you’ll learn the true power of your ascending force, and your journey to the top-side will be complete.
Note: As of yet, no free ascent on Death Star.
B. X-Wing (22m, 5.8)
This one starts at the lower south-side base of the Star Wars Buttress, opposite from Death Star. You’ll recognize it by the conspicuously large and slanted overhanging block, ten meters off the deck.
Begin with easy moves for five meters, up a low corner fissure to the top of a platform ledge. Next comes the crux; five meters of face climbing upward and left, pulling on well-spaced blades and pockets, then reaching directly up for hidden buckets on the massive leaning block. (Or, bypass the block by moving right onto a leaning slab.) From the slab, then, traverse left onto the big block, and move upward for an easy six-meter scramble to a splitter that’s just beyond vertical. Let the force flow through you and work the crack until you’re over the lip, onto a narrow ramp. Easy steps take you up to a short ledge, and most folks get lowered from there. If topping out is important to you, however, then edge yourself left and upward, and scramble to the anchors above.
The climb is usually top-roped, but it’s gone free a couple of times. The crux section above the platform ledge can be tricky to protect and TCU’s are nice to have there. Otherwise a light rack of stoppers will be just fine.
Red Five, Standing By (5.8)
Here’s a deviation from X-Wing that takes a more direct and challenging line from the top of the leaning slab. Instead of moving left to the slanted boulder, traverse right and ascend on steeper slabs. When you’re level with the bottom of the big splitter on your left, edge over to the crack and finish as before.
C. Jedi Mind Trick (22m, 5.8 TR)
This has the same starting point as X-Wing, but the route immediately moves right, up a scrappy ramp and through heinous bushes, to a squatty dihedral under a roof. Just above eye-level, at a joint where the roof meets the wall, a grippy, angled crack invites you to hang on. From here, assault the roof directly, or exploit the crack and use alternating underclings to lie-back your way diagonally around the upper left edge. Next, embark on a delicate dance past tiny, rough scoops and finger grabs to where the wall leans slightly over your head. Find a suitably high placement for one hand, then commit-and-go by pulling down, while smearing with your feet. If the force is with you, your free hand will be guided up and beyond your vision to the perfect bucket. Use this money-hold to hoist yourself over the crux, and from there the rest will be like shootin’ womp rats in Beggar’s canyon, back home!
Note: Jedi Mind Trick still awaits a free ascent.
The Middle Buttress (School of Rock)
[Christian Hettick, Jim Ryan and Jean Michelle Delmot, autumn ‘05]
This feature stands like a tall island (or row of islands) in the wide stony passage that leads on up from the Star Wars Buttress to the summit. It was first climbed by Christian Hettick, Jean Michelle Delmont and myself in autumn of 2005. Across the scree from the starting point of X-Wing and Jedi Mind Trick, the lower base of the Middle Buttress is uphill and to the right, a dozen paces or so. Three climbs have been put up here, but only one gets much follow up use.
To access the upper reaches for setting a top rope, hike from the lower base for about 15 meters uphill along the south side of the buttress. This brings you to a divide stuffed with two, freight car-sized boulders and assorted debris. The divide separates the lowest island of the buttress from its higher neighbor to the east, and in it you’ll find a very steep passage that requires 4th moves to get you up on top. Look for notched steps, carved into the lining walls by previous users. Yeah, they’re peculiar, but they’ll serve you well on your way up.
Above the divide, move left onto the lower island and seek out a suitable anchorage depending on the route you’ll be working. For the horn above Hyperdrive, a couple of long slings will probably be enough. But for the rough open corner at the top of Launch Pad, you’ll need to build the kind of multi-pointed anchor system that requires previous knowledge and experience. Your gear should probably include a handful of draws and stoppers (#1-3), a couple of cams (#1-2), some slings and a long narrow gauged line for making a cordelette.
D. Launch Pad (5.4 TR)
Launch Pad is a low-angled pitch suitable for beginners, partly because the route is pretty obvious and can be clearly viewed from the bottom. A shallow boulder on the ground near the base of the climb makes a fine perch for the belayer.
Begin climbing at the lowest and most western point of the Middle Buttress. Ascend directly up the ridge, choosing from ample holds. Some of your focus will be on how to prevent your top rope from becoming tangled in a wicked, grasping bush that’s about midway up and just to the right of the route. Once you’re safely past that scraggly green demon, continue on up to tag the anchors.
E. Crack·a·Lackin’ (Project, 5.9?)
So far, this well-defined crack has been a great route for falling off of. Even with a top rope, it’s still waiting for a pure ascent. For now, the anchor is the same as for Launch Pad. The belay stance, however, is about eight meters up the scree on the east (left) side of the Middle Buttress. Consequently, you’ll need to watch for dislodged rocks as the top rope drags on the unseen surface up above the climbing zone. In the future, when someone has the chance, permanent anchor bolts should probably be placed above this pitch.
The climbing is steep and mostly straightforward. After kung·foo·fightin’ your way past an offensive bush, follow a vertical joint that might work for a lie-back higher up. The uppermost section requires unforgiving hand placements in a razor-laced crack behind a flake. Transitioning from this crack onto the ledge above is the crux, and once that’s behind you the route merges with Launch Pad for an easy finish, inshallah.
F. Hyperdrive (5.8+)
This route begins on the east side of the Middle Buttress just below the entrance to the 4th class access passage described earlier. For a top rope anchor, scramble up the same access route as for Launch Pad and place slings around a prominent horn located at the top of the route. The climbing starts out moderate and becomes a bit tricky at an off-balanced face just below the top.
Right Wall Buttress (School of Rock)
[Jim Ryan and Christian Hettick, spring ‘05]
The Right Wall is the high cliff barrier on the right side of the main couloir leading up to the Terminator. Although the entire wall is technically a buttress on its own, the Right Wall Buttress is a name I’ve given to the bulky subsidiary cliff protruding from it in an eastward direction.
As you’re approaching from the base of the Middle Buttress, move west, toward the Right Wall, and then right to the entrance of a den-like opening between upright leaning slabs. This spot makes a good belay stance for both Pilgrims Progress and The Right Stuff.
To access the upper region of the first pitch for setting a top rope, hike left (south) from the base for 30 meters, and then switch west up to the Right Wall. Work your way to the right until you find a huge oblong boulder with a platform at its base. Standing on this flat patch puts you directly above the belay stance. Lace a couple of extra long slings around the top of the boulder, add two locking biners, and voila! You’re golden.
One disadvantage of this set up is that the anchor point isn’t visible from the belay stance.
Judging by the bolts and pitons discovered while making what we thought was a first ascent, this route has been established for quite some time.
G. Pilgrim’s Progress (5.4) (5.5) (5.6)
The first pitch of this climb is terrific for the blossoming novice. The remaining two pitches are fun as well, and offer a healthy measure of exposure. Combined, they make an excellent first lead on a very moderate surface.
Unfortunately, for each of the three pitches, the belayer eventually will lose sight of the climber. This means that crisp vocal communication will be critical.
The description that follows is for a multipitched ascent to the top, but brand new climbers will have more fun concentrating on just the first pitch alone.
a. Pilgrim’s First Pitch (5.4)
Rely on ledges and steps all the way up to, and through, a face bounded on the right by a blocky uneven ridge. If you’re leading, spacious joint between this ridge and the face makes for solid cam and hex placements. Pull over the upper edge of the face onto a counter top.
If you’re top roping, this counter is the best place from which to be lowered. Climbing on until you reach the boulder anchors, beyond the vision of your belayer, can make for weak communication and an awkward descent.
If you’re red pointing, then continue up big and easy steps to stacks of boulders. Build a sturdy four-point cordelette anchor and belay your second up to this spot.
b. Pilgrim’s Second Pitch (5.5)
You’ll easily find your way along the short ridgeline that leads to the exposed cliff on the other side. Edge yourself out over the abyss, pausing long enough to place some pro about midway. Soon, you’re back on solid ground and working your way up to a bolted belay station on the main ridge of the buttress. Secure yourself, get rigged for your partner, and belay on, bro! It’s a nice perch from which to enjoy a spectacular view while you wait for your second to join you.
c. Pilgrim’s Third Pitch (5.6)
From the bolts, move left past a shallow window that penetrates through the buttress. Go briefly up and right, onto a face and then a gutter that leads to an exposed bolted horn. The buttress extends upward for a few more, low angled meters, so continue along the incline if you’d like a glimpse over the edge. To rig a belay station, return to the horn and incorporate the bolt into your anchor system.
After your second tops out and you’ve cleaned up the gear, use doubled 60 meter lines to rap from slings, down the east side of the Right Wall, and then to boulders on the ground. When you touch down you should be just 40 meters uphill from where you began at the base of Pilgrim’s First Pitch.
H. The Right Stuff (5.7)
Climb right, up and over flakes and boulders to a broken arête that frames the main face of Pilgrims Progress. Ascend straight up the arête using buckets and jug handles, but be en garde for loose rock and sketchy holds. From the top, walk off or rap down on Pilgrim’s First Pitch.
7. Climbing Higher …
As you continue to hike up from The School of Rock toward the summit, you’ll enter a region of additional climbing possibilities, certainly not limited to the very few I’ve described below. A variety of cliffs, faces and pinnacles are available here, and many crags with excellent views can be won with a short bit of moderate 4th class scrambling.
I. Shak·n·Flake (5.7)
Just upslope and east of the Middle Buttress you’ll notice an isolated, tapered gendarme that’s about 25 meters high. Tom Bloom and I put up a lone route beginning at the lowest point on tower’s northwestern base. The climbing can be unsettling as the stability of the rock surface is quite dodgy. Still, ample, solid material is available for those with the will to send it. Bring a medium range of stoppers, cams and TCUs, as well as some slings and longer draws for protection.
Ascend up and left, making use of frequent holds and pockets. Check for large, hollow sounding flakes, which may be weakly attached to the superstructure. Work your way to the top of a high-up, offwidth where a flake splits from the main edifice. Mantle the flake and step over the gap to an easy finish.
Avoid rapping from the chossy, fragmented horn on top in favor of spanning the deep, narrow chasm to the south and continuing with a 4th class descent along the southeastern backside of the prominence.
The Terminator Buttress
[Jim Ryan and Christian Hettick, autumn ‘05]
This prominent feature is easily recognizable with its west face gashed by a sinister, 80 meter rift (The Schism). From your car, The Terminator might appear to be the highest point on the mountain, but it’s actually a lesser, supporting buttress fractured vertically into three large members.
J. The Schism
The striking crevice slicing down from the top of the Terminator Buttress is both cool and spooky. Climbing up into the gap itself is messy business due to some thick foliation. Plus, higher up in the darkness, are several dozen toaster-sized boulders, perched on a hidden ramp; widow makers waiting to cascade your way at the slightest offense.
I initially explored some ground-up climbing in The Schism with Christian Hettick, but found it to be an inhospitable place. If you decide to make the attempt you might find a few pieces of the anchor we built to escape after the first pitch at 25 m off the deck.
K. The Headwall
The face adjacent to and left of The Schism offers what looks to be some challenging climbing. A few bits of tired pro’ (pitons and bolts) still remain from some past climber’s archaic project. Good luck with that.
L. Side Winder (5.6….)
Starting from the base of the Head Wall, continue hiking toward the summit, left and up around the Terminator. The cliffs to your right offer some areas to investigate as well as a variety of potential routes to the top of the Terminator. Side Winder is just one of these, and since the route itself isn’t that interesting, it won’t get a description here. Besides, you’ll probably have more fun poking around and finding your own way up. I mention it to let you know the area has been explored a little as a 5th class access to the summit of The Terminator Buttress.
Heart of Darkness
…is a suitable name for the narrow, manky alley that inclines sharply from the bottom of The Schism, up and south along the base of The Terminator. It can be used as a scrappy alternative route to the mountain’s summit ridge, involving steep hiking and at least one 4th class step.
Exiting the top of the dark and foliated alley you’ll move into an open draw with more crags and walls. We’ve only begun examining this area for its climbing potential, so I’m calling it ‘The New World.’
M. The New World
As you exit Heart of Darkness, the buttress straight ahead and a little down slope offers interesting, south oriented slabs and cracked faces that can be explored with moderate climbing, plus an ample rack of stoppers, cams and slings. As mentioned above, I’ve only recently made inroads here with Tom Bloom and Ashref Marzouk, so its still mostly terra incognita with respect to climbing. Alas, so much rock and so little time.
Contact Me…at: [email protected]
…About future projects, additions and corrections.
If you’re a climber and you plan to develop some new routes of your own on the mountain, I’d be curious to know how that goes. Please email me at the address above with a short description of your route(s), including details about location, length and difficulty. Any photos would be a bonus.
Also, if you know of additional history or relevant geographical information about Djebel Ressas, I’d be very glad to learn it from you. All of the place names I’ve used in reference to sites and features on the mountain are my own, and if others exist, I’m not aware of them. However, if you have alternative designations, perhaps in Arabic or French, I’d be grateful to learn about those as well.
You can probably tell that this is my first attempt at writing a field guide. Should you come across errors, or if you can suggest additional details that might be worth including here, please make me aware of them and I’ll improve the guide when I can, even if it’s from abroad.
Acknowledgements:
Field Work:
Many adventurous souls have helped me explore Djebel Ressas and some were instrumental in discovering new paths and establishing fresh routes. I’d like to recognize a few of these for their shared interest, early morning enthusiasm and valuable assistance in the field.
My Thanks to:
Christian Hettick Ashref Marzouk
Tom Bloom Jean Michelle Delmont
Kurt Shulz Jim Shin-Gay
Production and Photography Credits:
Merci to Jim Shin-Gay and Rick Park for advice on the arrangement of this document. For the digital images of climbers, shukuran to Dorien Butter, Barbara Jardine, Erin Hettick and Heidi Ryan. Thank you to Terry King for the title image of the Terminator Buttress. I took the shots of Death Star and the Middle Buttress.
Influential Climbing Pals:
Technical climbing is best done with a reliable partner. Over the years, I’ve been privileged to regularly tie in with several solid climbers, each of them influencing my growth in the sport. For their excellent companionship and for the security and confidence they’ve instilled with every “belay on!”, I’d like to express my appreciation to:
Bill Newton Matthew Dick
Jay Wyse Tracy Scaramella
Joel Lechelt Christian Hettick
Terry Stoll Tom Bloom
 Djebel Ressas – Climbing, Hiking & Mountaineering information